Data Labels can be posted for objects on a base or thematic map. Data must be linked to the active layer to open the Data Labels page. The map objects must have primary IDs associated with them.
Symmetric shapes cannot be linked to data, and therefore rectangles, rounded rectangles, and ellipses cannot have data labels. Click the Symmetric Shape to Polygon command to be able to post data labels to symmetric shapes.
Data labels can be added for polygon, point, or polyline objects.
When data labels are added to polygons, the posted data is drawn at the polygon's centroid (geographic center). The polygons use the default fill and line properties or you can set unique fill and line properties for each polygon on the map.
For points, the data is posted directly on top of the points. If you want, you can use the View | Display | Show Objects command and disable the display of the point symbol by unchecking the Symbol option. The posted data is still shown, but the point location symbols are not drawn. Points can be added to a map using the Draw | Shape | Point command. Also, you can create points from XY coordinates in a data file with a pin map.
For polylines, the posted data are drawn at the midpoint along the curve.
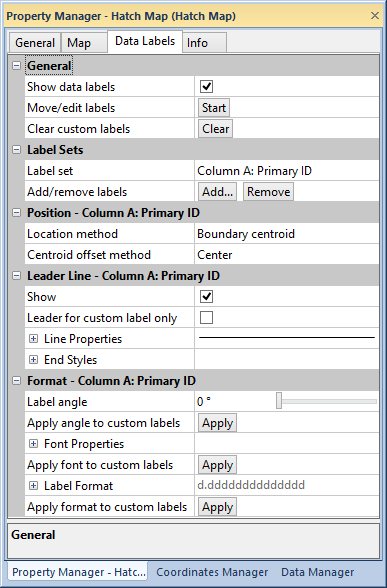
Show, select, and format labels on the Data Labels page in the Property Manager.

Select labels to show, move and edit labels, and add lead lines on the Data
Labels page of the Property Manager.
The General group contains options to show, move, edit, and clear labels and select the columns containing the primary ID.
Click the Show data labels check box to add data labels to the map.
Click the Start button next to Move/edit labels to start Edit Post Labels mode. Click the Finish button to stop editing data labels.
Click the Clear button to the right of Clear custom labels to return labels to default position and style.
The Label Sets group contains the selected labels. Labels are added and removed in the Label Sets group.
The Label set list contains the data labels that are displayed on the map. Select a data column in the Label set list to edit the label position, lead lines, and format.
Click the Add... button to add data columns to the Label set list with the Pick Columns to Add dialog.
To remove a data column label from the map, select the data column you wish to remove in the Label set list, then click the Remove button.
The selected data column in the Label set list is positioned in the Position: group.
The Position options indicate the relative location of the posted data. You can select either Boundary centroid or Data coordinates for each posted variable. If you choose Data coordinates, the X and Y coordinates must be in the current data file. Select the X and Y coordinate data columns in the appropriate X column and Y column list. Move an individual data label with Edit Post Labels or Move an object's centroid with Move Centroids.
The Centroid offset method options let you specify the relative offset for each posted variable. If you are posting more than one variable, you can use different Centroid offset method settings so the posted labels to not overwrite one another. If a User Defined offset is selected, set the X offset and Y offset boxes to place the labels. The values are in page coordinates.
Leader lines are added for the selected data column in the Label set list in the leader line: group. Line properties for leader lines are edited in the Leader Line: group.
Click the Show check box to show or hide leader lines. Click the Leader for custom labels only check box to add leader lines to only labels moved with the Move/edit labels command in the General section.
The Label angle property rotates the data labels. Type a value in degrees into the Label angle field, or click and drag the slider bar to adjust the label angle. If you have custom moved labels, click the Apply button in the Apply angle to custom labels field to rotate the custom labels.
Set text and font properties and label format properties for the data column selected in the Label set list in the Format: group. Apply font and format property changes to custom labels by clicking the Apply button in the Apply font to custom labels and Apply format to custom labels fields, respectively.
See Also