 button
on the Quick Access Toolbar.
button
on the Quick Access Toolbar.There are many useful MapViewer sample boundary and data files. One boundary file that is not included with MapViewer is a single map that includes the states or provinces of the United States, Canada, and Mexico. In the first Advanced Tutorial lesson, we will use a few of the boundary editing tools in MapViewer to generate a useful template file.
1. Click File
| New | Plot or the button
on the Quick Access Toolbar.
2. Create three additional layers by clicking the Map | Layer | New Layer command.
3. Name the layers by clicking once on the layer in the Object Manager, waiting a moment, and clicking again. Name Layers #2-4 "United States" "Canada" and "Mexico" by typing in the name and pressing ENTER. Layer #1 will eventually be deleted and does not need to be renamed.
4. Click on Layer #1 in the Object Manager to make it the active layer.
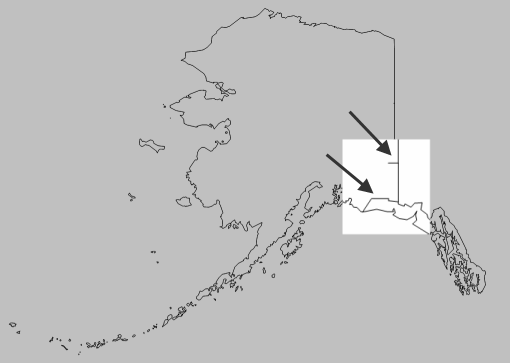
The US50LL.gsb and US50Alb.gsb sample files have Alaska and Hawaii moved from their actual location for more convenient presentation in a map of the United States. This will not suffice for our map. So we have to import Alaska and Hawaii and make them each single objects.
1. Verify that Layer #1 is the active layer in the Object Manager. If it is not, click on Layer #1.
2. Select File
| Import or click the  button
on the Quick Access Toolbar.
Select the AK2010.GSB sample file in the Import dialog and
click Open. The default import
options are sufficient for this tutorial, so click OK
in the Import Options dialog.
button
on the Quick Access Toolbar.
Select the AK2010.GSB sample file in the Import dialog and
click Open. The default import
options are sufficient for this tutorial, so click OK
in the Import Options dialog.
3. In the Object Manager click the first object 02240, hold the SHIFT key, and click the last object 02013. Click the Arrange | Selection | Select All command. You can also select all the objects in the Object Manager or select all the objects by clicking and dragging around the objects in the plot window.
4. Click the Boundary | New Boundaries | Union of Polygons command. Uncheck Keep original areas and Keep inner lakes if their boxes are checked in the Union of Areas dialog, and then click OK.
5. Again, click the Select All command. Next, click the Boundary | Islands/Lakes | Combine command.
6. Next click on the Info tab in the Property Manager to view the Info page. Change the PID to "AK" and the SID to "Alaska."
7. Notice there are two interior boundaries still visible in Alaska. The extra lines are highlighted in the image below.
Click the Boundary | Edit Boundaries | Reshape command to enable boundary editing mode. The polygon line color changes to red and vertices are indicated by red squares. Click on a vertex to select it. The selected vertex is indicated by green fill. Click on an interior vertex and the press the DELETE key to remove the vertex. Continue removing vertices until the interior lines are removed. Click the Boundary | Edit Boundaries | Reshape command again, or press the ESC key, to stop editing boundaries with the Reshape command.
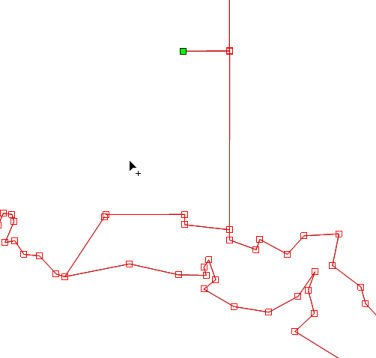
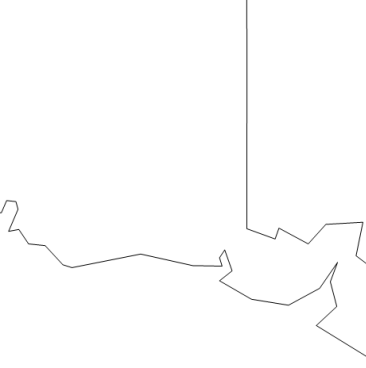
The left image above shows the area in Reshape mode with one vertex selected. The image on the right shows the area after interior
vertices have been deleted.
8. With AK selected in the Object Manager or plot window, click the Home | Clipboard | Move to Another Layer command. Select United States in the Move to Layer dialog and click OK.
9. Verify that Layer #1 is still the active layer in the Object Manager, then Import HI2010.gsb from the MapViewer samples file folder.
10. Click Arrange | Selection | Select All and then Boundary | Island/Lakes | Combine.
11. In the Property Manager Info page, change the PID to "HI" and SID to "Hawaii."
12. Select HI in the Object Manager or plot window and click the Home | Clipboard | Move to Another Layer command. Select United States in the Move to Layer dialog and click OK.
13. Click on Layer #1 in the Object Manager and press the DELETE key.
Next we will import the rest of the boundaries to complete the map.
1. Click Mexico in the Object Manager, and then click File | Import.
2. Select MEXICO.GSB in the Import dialog and click Open. Next, click OK in the Import Options dialog.
3. Import US48LL.gsb to the United States layer and Canada.gsb to the Canada layer in the same method.
4. MEXICO.GSB includes an object encompassing all of Mexico. You may wish to delete the Mexico polygon object in the Mexico layer.
Congratulations, you have a single boundary file with all of the American and Mexican states and Canadian provinces. If you wish to save this boundary file for later use, click the File | Save As command.
Back to Tutorial Introduction