The Gridding page is used to set the gridding options. The data are typically randomly spaced, and this data must be converted into an evenly spaced grid before MapViewer draws the gradient map. The Gridding page is available in the Property Manager when a Contour, Gradient, or Vector map is selected.
When creating a grid you can usually accept all of the default gridding parameters and generate a grid that represents your data well. Under most circumstances, the recommended gridding method is kriging.
There are several gridding parameters you can set when producing a grid. Refer to the gridding method for more information on specific parameters. All gridding methods require at least three non-collinear data points. Some methods require more data points. For example, a higher-order polynomial fit needs more than three data points; there must be at least as many data as there are degrees of freedom.
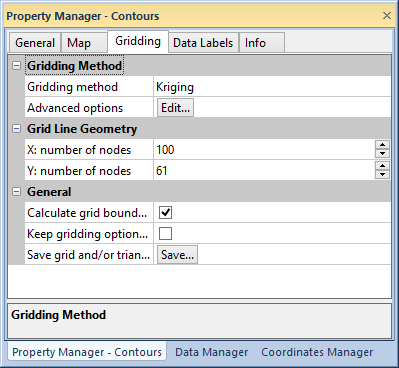
Change the gridding method, grid line geometry, and gridding options on
the Gridding page of the Property Manager.
Choose the gridding method and Advanced options in the Gridding method group. Refer to individual gridding method pages for more information and advanced options.
Grid line geometry defines the grid density. The grid density is defined by the number of columns and rows in the grid. The X: number of nodes property is the number of grid columns, and the Y: number of nodes property is the number of grid rows. There is a maximum of 10,000 rows and 10,000 columns.
Higher grid densities increase the smoothness in the map. However, this increases the gridding time. Although highly dense grids can be created, time and space are practical limits. Limited memory, very large number of data, very dense grids, or any combination of these factors can greatly increase gridding time. When gridding begins, the status bar provides you with information about the estimated gridding time to complete the task.
The General section contains options to calculate grid bounds, keep gridding options when changing data settings, and saving grids and triangles.
Click the check box next to Calculate grid bounds with all layers to include boundary objects from all layers in the grid bounds calculation.
Click the check box next to Keep gridding options when data settings change to keep the Gridding method Advanced options settings after changing the data for the map. Large changes in data with the Keep gridding options when data settings change property active will result in the entire grid being blanked out.
Click the  button next to
Save grid and/or triangles to
save the grid [.GRD] and/or triangles [.GSB] in the Save
Grids And Triangles dialog.
button next to
Save grid and/or triangles to
save the grid [.GRD] and/or triangles [.GSB] in the Save
Grids And Triangles dialog.
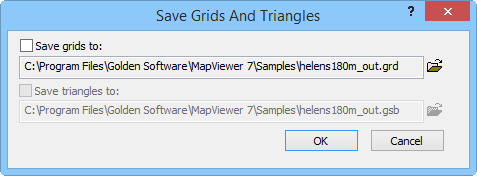
Select files to save and file location in the Save Grids And Triangles dialog.
Select which file to save by clicking the Save grids to: or Save triangles to: check boxes. Triangles can only be saved if the gridding method is Triangulation with Border Color Interpolation or Triangulation with Linear Interpolation. If any other gridding method is selected the Save triangles to: area is grayed out.
Click the  button to select the file location in
the Save As dialog.
button to select the file location in
the Save As dialog.
Click OK to save the selected files. Click Cancel to close the dialog without saving grid or triangle files.
The grids are internally created and used within MapViewer. There is no access to these files. If you need to access grid files, use more advanced gridding, or manipulate grids, use Golden Software's Surfer instead.
Some gridding operations can take a few seconds, depending on the gridding settings, data set, and your computer's capabilities. The status bar displays information about the gridding process, from left to right: the gridding method, a completion bar, completion percent, time remaining estimate, and a Cancel button. Click the Cancel button to pause the gridding operation and choose to Continue or Abort in the dialog that is displayed. However, the gridding operation that is performed when creating a contiguous cartogram map cannot be cancelled.
See Also