Thiessen Polygons
The Boundary | New Boundaries | Thiessen
Polygons command  creates boundaries from selected points. The diagram can consist of polygons,
polylines, or points. In a Thiessen polygon diagram, also known as a Voronoi
diagram, a region is drawn around each point so that for each point every
position in the region around that point is closer to that point than
to any of the other points.
creates boundaries from selected points. The diagram can consist of polygons,
polylines, or points. In a Thiessen polygon diagram, also known as a Voronoi
diagram, a region is drawn around each point so that for each point every
position in the region around that point is closer to that point than
to any of the other points.
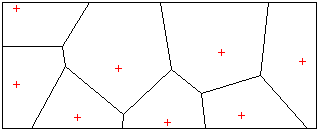
In this
example, an area diagram was created from selected points.
Creating a Thiessen Polygon Diagram
To create a Thiessen polygon diagram:
1. Select
two or more points and an area if you wish to contain the diagram within
an area.
2. Select
the Boundary | New Boundaries | Thiessen
Polygons command.
3. Set
new line, fill, symbol, and ID properties and choose whether or not to
create the new polygons, polylines, or points on a new layer in the Thiessen Polygons dialog.
4. Click
the OK button in the Thiessen
Polygons dialog to create Thiessen polygons.
Thiessen Polygons Dialog
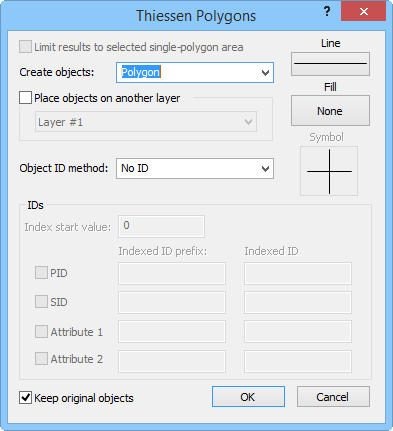
Set new line, fill, symbol, and ID properties and choose
whether or not
to create the new polygons, polylines, or points on
a new layer in the
Thiessen Polygons
dialog.
Limit Results to Selected Single-polygon Area
Check the Limit results to the selected
single-polygon area box to limit the diagram to a selected area's
boundary.
Create Objects
You can choose to create polygons, polylines, or points in the Create objects list.
Place Objects on Another Layer
Check the Place objects on another
layer box to create the new areas on a different layer. Select
a layer from the list below. The list does not include locked layers,
layers containing cartogram maps, or layers containing prism maps.
Line, Fill, and Symbol Properties
Click the Line button to select
line properties, click
the fill button to select fill properties, and
click the Symbol button to select
symbol properties for
the new areas.
Object ID Method
You can choose IDs from the Object
ID method list. Choose No ID
and no IDs are assigned to the new areas. Select Prefix+index+suffix
to create an ID from the items in the IDs
group. Select Source IDs to use
the original area's IDs in the new area.
Keep Original Objects
Check the Keep original objects
box to create new areas while leaving the original selected areas unchanged.
See Also
Triangulation
Boundary Tab Commands