Use the Fill Properties to change fill properties for selected objects in the document. You can set default fill properties through File | Options | Default Properties by clicking on Fill.
Most fill properties are edited in the Property Manager in a Fill Properties section. When changing fill properties for a selected object, the Fill Properties section will appear in a different location in the Property Manager, depending on the type of object selected.
Occasionally, objects will open a Fill Properties dialog to access the fill properties.
Edit the Fill Properties for a selected object
in the Property Manager.
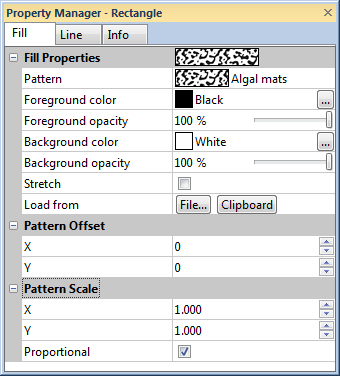
The sample shown next to the Fill Properties line shows the selected pattern, foreground color, and background color.
Change the Pattern by selecting a pattern from the fill pattern palette. Open the pattern palette by clicking the pattern button. Click on a new pattern in the list to select it.
To load a fill pattern from a raster image file, click the File or Clipboard button. The Clipboard button is only active when there is an image on the clipboard suitable to use for a fill pattern. If you select File, an Import dialog will appear. Click on the image file and click Open to load the image as the fill pattern.
Foreground color is the color
of the pattern lines or pixels. Select a new color by clicking on the
color in the color palette. Only the
foreground color can be applied to solid colors. The foreground colors
can be applied to any stock hatch pattern or grayscale image pattern.
They cannot be applied to the None
pattern or non-grayscale image patterns. Click on the  button at the right of
the color sample to open the Colors
dialog, where you can specify a custom color.
button at the right of
the color sample to open the Colors
dialog, where you can specify a custom color.
The Foreground opacity is the
amount of transparency of the fill. This is a value from 0% (completely
transparent) to 100% (completely opaque). To change the value, highlight
the existing value and type a new value. Press ENTER on the keyboard or
click anywhere else in the Property Manager
to make the change. Alternatively, click and drag the  to change the opacity percentage. Opacity is disabled if it does not apply
to the current pattern. Note that for true color image fill patterns the
Foreground opacity applies to
the image in its entirety.
to change the opacity percentage. Opacity is disabled if it does not apply
to the current pattern. Note that for true color image fill patterns the
Foreground opacity applies to
the image in its entirety.
Background color is the color
behind the pattern. All patterns must have a background color. If you
do not wish to see the background color, change the Background
opacity to 0%. Click on the button at the right of
the color sample to open the Colors
dialog, where you can specify a custom color.
Change the Background opacity
by entering a value from 0% (completely transparent) to 100% (completely
opaque) or dragging the slider to change
the opacity percentage. Opacity is disabled if it does not apply to the
current pattern.
Check the Stretch option to stretch image fills to completely fill the geometry. If Stretch is not selected, the image will be repeated to fill the geometry. When Stretch is applied to the fill image, the Pattern Scale options are not available.
The Pattern Offset can be changed for image patterns. The offset controls the location of the pattern within the geometry. Change the X and Y values separately to move the image in the desired direction.
The Pattern Scale can be changed for image patterns. The scale controls the density of the pattern. In the Property Manager, check the Proportional box to connect the X and Y scale values. When Stretch is applied to the fill, the Pattern Scale options are not available.
When the scale is proportional, the current aspect ratio is maintained. Changing the X or Y scale will cause the other scale to be adjusted proportionally to maintain the aspect ratio at the time the scale was set to proportional.
See Also