 or clicking empty space in the Object
Manager or plot window.
or clicking empty space in the Object
Manager or plot window.Maps are usually seen in a flat, two-dimensional medium such as a drawing on paper or an image on a computer screen. Since the surface of the Earth is curved, or three-dimensional, the visual elements on the surface must be transformed from three dimensions to two in order to display a map of the Earth's surface. Projections are a mathematical process by which the visual elements are transformed from three dimensions to two. The Introduction to Map Projections help page discusses map projections in detail.
You can select the target coordinate system from your map in the Coordinate System page in the Property Manager for the plot properties. Data and boundary files may have different, or even undefined, projections. MapViewer converts the information for the map layers from their source coordinate system to the target coordinate system.
To change the map projection:
1. View
the plot properties
in the Property Manager by clicking
the Map | Plot | Plot Properties
command or clicking empty space in the Object
Manager or plot window.
2. In the Property Manager, click the Coordinate System tab to view the Coordinate System page.
3. Click the Change... button in the Coordinate system field to open the Assign Coordinate System dialog.
4. Navigate
to the Templates section by clicking
the expand  buttons next to Predefined
and Templates. Select Template - Equidistant Cylindrical Projection
in the projection list.
buttons next to Predefined
and Templates. Select Template - Equidistant Cylindrical Projection
in the projection list.
5. Click the OK button.
Notice the title text, title rectangle, and edited data labels have appeared to move or rotate. Actually their locations relative to the map coordinates has not changed. Use the Move/edit data labels mode in the Hatch Map Property Manager Data Labels page to reposition the state PIDs for the northeastern states. Use the Arrange | Rotate | Rotate and/or the Arrange| Rotate | Free Rotate commands to rotate the map title text and rectangle. Notice that the graticule limits have also changed. You can change the graticule limits in the Graticules page of the plot properties.
Alternatively, you can press CTRL + Z or click Home | Undo | Undo to revert back to the map's original projection.
Map projections can be modified, saved, and managed in the Assign Coordinate System and Define Coordinate System dialogs.
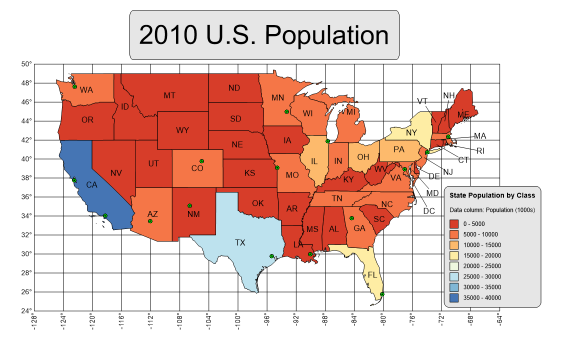
Your finished map should look similar to the above map. Notice in this map, the pin labels were
forgone for hatch map data labels showing the state PIDs. Also, the map title and state PIDs
were repositioned after the projection was changed.
Back to Lesson 6.1 - Creating a Pin Map