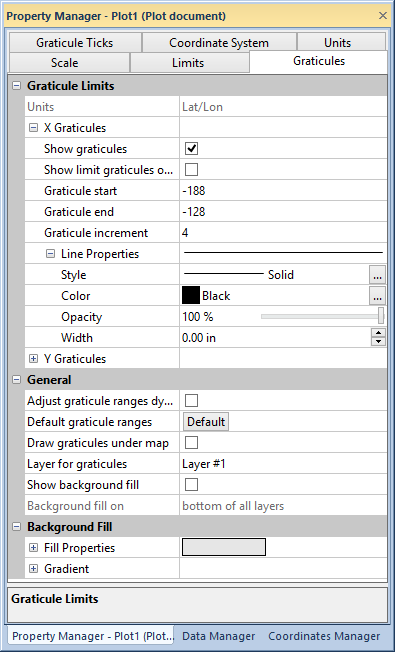
The Graticules page contains all of the options and settings for the graticule line properties. The Longitude (X) and Latitude (Y) columns represent the settings for the appropriate graticule lines.

Specify the graticule limits, spacing, general, line, and background fill properties in the Graticule page of the Property Manager.
You can choose the graticule line units from the Units list. If the projection is Unknown, the available units are Map Units, Page Inches, or Page Centimeters. If the projection is Unprojected Lat/Long the available unit is Lat/ lon. Any other projection allows you to choose from the full list of available distance units.
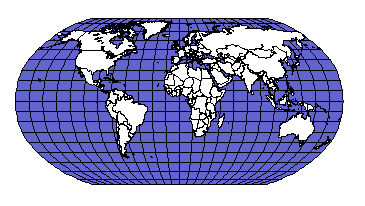
Checking the Show graticules box displays the graticule lines. If these check boxes are not checked, the graticule lines are not visible. If the Show limit graticules only boxes are checked, only the graticule lines at the map extents are displayed. This option is a convenient way to add map axis lines to your map. When you check these boxes with the Show background fill option (below), a background is added to your map.
Graticule start, Graticule end, and Graticule increment fields control how often lines of each type are drawn. The starting, ending, and increment values must be specified in graticule units. If the Adjust graticule ranges dynamically box is checked, the graticule range is adjusted each time a map is changed, such as when objects are added or deleted. Click the Default Ranges button to change the numeric values back to the defaults.
Click the line properties to change the Style, Color, Opacity, and Width of the graticule lines.
The graticule can be placed above or below a map or on any layer in the map window.
Check the Adjust graticule ranges dynamically box to adjust the graticule each time objects are added or deleted.
If Draw graticules under map is checked, the graticule is drawn under all other objects on the layer containing the graticule. Otherwise, the graticule is drawn on top of all other objects in the layer. If a boundary map containing areas does not have filled areas, the graticule may appear on top of the map when they are actually behind the map. Set the fill color to white (or other color) to avoid this.
To place the graticule on a layer other than the current layer, choose a layer from the Layer for graticules list, and then check the Place graticules on another layer check box.
To return the graticule range to the default values, click the Default button to the right of the Defalut graticule ranges property.
The Show background fill check box enables or disables the background fill for a graticule. The Background fill on list specifies where you want to place the background fill. Choose from bottom of all layers or graticule layer. Bottom of all layers places the background fill behind all of the map layers, and graticule layer places the background fill on the layer containing the graticule.
The buttons beneath the Background fill on list defines the background fill pattern, colors, opacity, and gradient properties for the graticule background.
It is important to note that the graticule lines are not placed on the bottom of all layers with Bottom of all layers, only the graticule fill is placed there. Graticule lines are placed under the map with the Draw graticules under map property. Also, certain map projections (such as those projections suited for polar perspectives of the earth) are not completely compatible with graticule background fills and can have undesirable results.

Show background fill makes it simple to add a background to your map.
See Also