 creates
a new area from selected polygons, polylines, or points. A new area is
formed around the selected objects.
creates
a new area from selected polygons, polylines, or points. A new area is
formed around the selected objects.The Boundary | New Boundaries | Convex
Hull command creates
a new area from selected polygons, polylines, or points. A new area is
formed around the selected objects.
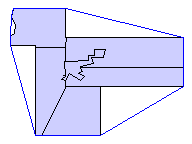
The Convex Hull command creates a new
area around selected boundary objects.
To create a convex hull:
1. Select one or more polygons, polylines, or points.
2. Select the Boundary | New Boundaries | Convex Hull command.
3. Set new line, fill, and ID properties and choose whether or not to create the new area(s) on a new layer in the Create Convex Hull dialog.
4. Click the OK button in the Create Convex Hull dialog to create the new area(s).
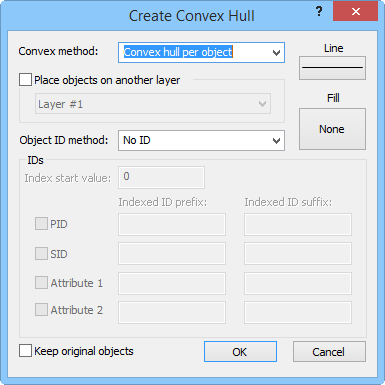
The Create Convex Hull dialog places the new areas on another layer,
sets IDs, sets line and fill properties, and keeps the original objects.
You can choose to create a convex hull around each of the selected objects with the Convex hull per object option. Create the convex hull around all selected objects with Convex hull per group.
Check the Place objects on another layer box to create the new areas on a different layer. Select a layer from the list below. The list does not include locked layers, layers containing cartogram maps, or layers containing prism maps.
Click the Line button to select line properties, and click the fill button to select fill properties for the new areas.
You can choose IDs from the Object ID method list. Choose No ID and no IDs are assigned to the new areas. Select Prefix+index+suffix to create an ID from the items in the IDs group. Select Source IDs to use the original area's IDs in the new area.
Check the Keep original objects box to create new areas while leaving the original selected areas unchanged.
See Also