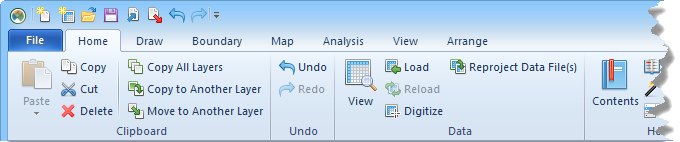
The Ribbon is the strip of buttons and icons located above the plot, worksheet, and grid windows. The Ribbon replaces the menus and toolbars found in earlier versions of MapViewer. The ribbon is designed to help you quickly find the commands that you need to complete a task.
Above the Ribbon are a number of tabs, such as Home, Map, and Analysis. Clicking or scrolling to a tab displays the options located in this section of the ribbon. The tabs have commands that are organized into a group. For instance, all the boundary editing related commands are on the Boundary tab.
The Ribbon is displayed with the Home tab selected.
The ribbon can be minimized to take up less space on the screen. To
minimize the ribbon, right-click on the ribbon and select Minimize
the Ribbon,click the  button in
the top right portion of the MapViewer
window, or press CTRL+F1. When displayed in a minimized mode, only
the tabs at the top of the screen are visible. To see the commands on
each tab, click the tab name. After selecting a command, the ribbon automatically
minimizes again.
button in
the top right portion of the MapViewer
window, or press CTRL+F1. When displayed in a minimized mode, only
the tabs at the top of the screen are visible. To see the commands on
each tab, click the tab name. After selecting a command, the ribbon automatically
minimizes again.
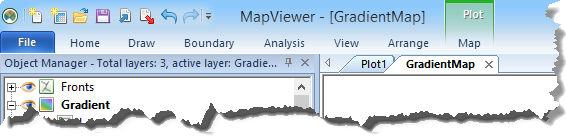
The Ribbon displayed with the Minimize the Ribbon option selected. Clicking any tab name displays the ribbon.
The ribbon is customizable in MapViewer. To customize the commands in the ribbon, right-click on the ribbon and select Customize the Ribbon.
In the Customize Ribbon dialog, you can add new tabs, add groups, hide existing tabs or custom groups, and add commands to any custom group. You can also rearrange the tabs into an order that fits your needs better.
To customize the commands in the Customize Ribbon dialog, right-click on the ribbon and select Customize the Ribbon. In the Customize Ribbon dialog, use the following options.
To add a custom tab, set the Customize the Ribbon section to All Tabs. Click in the list on the right side of the dialog where the custom tab should be located and click the New Tab button.
To delete custom tab, right-click on the tab name in the list on the right side of the dialog and select Delete.
To rename a default or custom tab, click on the tab name in the list on the right side of the dialog. Click the Rename button. Type the new name and press OK to make the change.
To hide a default or custom tab, uncheck the box next to the tab name on the right side of the dialog. Only checked tabs will be displayed.
To change the order of default or custom tabs, click on the tab name that should be moved in the list on the right side of the dialog. Click the up and down arrow buttons on the far right side of the dialog to move the selected tab up or down. Default tabs must remain in their major group.
To
add a custom group to a default or custom tab, click on the  next
to the tab name. Click in the list of group names where the new group
should be located and click the New
Group button.
next
to the tab name. Click in the list of group names where the new group
should be located and click the New
Group button.
To delete a default or custom group on any tab, right-click on the group name in the list on the right side of the dialog and select Delete.
To rename a default or custom group on any tab, click on the group name in the list on the right side of the dialog. Click the Rename button. Type the new name and click OK to make the change.
To change the order of default or custom groups on any tab, click on the group name that should be moved in the list on the right side of the dialog. Click the up and down arrow buttons on the far right side of the dialog to move the selected group up or down in the list.
To replace a default group with a custom group, right-click on the default group name and select Delete. Click the New Group button. Add the desired commands to the new group that you want displayed. Rename the new group, if desired.
Commands can only be added to or deleted from custom groups. Commands can only be rearranged or renamed in custom groups. If commands in default groups are desired to be edited, the default group should be deleted and a new custom group should be created with the same commands.
To
add a command to a custom group, set the choose
commands from list to All
Tabs so that all commands are listed on the left side
of the dialog. Select the desired command that should be added. On
the right side of the dialog, click the
next to the custom group name. Click on the desired position in the
list of commands. If no commands exist in the group yet, click on
the group name. Click the Add>>
button and the command is added to the custom group.
To delete a command from a custom group, right-click on the command name in the list on the right side of the dialog and select Delete. Only commands from custom groups can be deleted.
To rename a command in a custom group, click on the command name in the list on the right side of the dialog. Click the Rename button. Type the new name and click OK to make the change. Only commands in custom groups can be renamed.
To change the order of commands in a custom group, click on the command name that should be moved in the list on the right side of the dialog. Click the up and down arrow buttons on the far right side of the dialog to move the selected command up or down in the list.
To reset all customizations on the ribbon, click the Reset button at the bottom of the Customize Ribbon dialog.
See Also