 button to open the Download
Online Maps dialog. This dialog downloads data or maps from any
web mapping server (WMS). Images can be downloaded from any of the existing
servers or new servers can be added to the list.
button to open the Download
Online Maps dialog. This dialog downloads data or maps from any
web mapping server (WMS). Images can be downloaded from any of the existing
servers or new servers can be added to the list.Click the Map | Add | Download Map
command button to open the Download
Online Maps dialog. This dialog downloads data or maps from any
web mapping server (WMS). Images can be downloaded from any of the existing
servers or new servers can be added to the list.
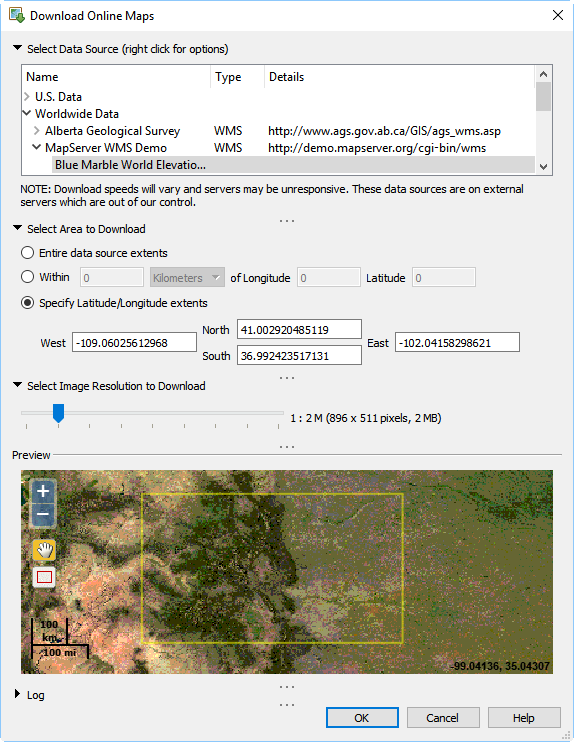
Set the image properties in the Download Online Maps dialog.
In the Select Data Source section,
click the ![]() to open a section. The arrow turns black
to open a section. The arrow turns black ![]() when a section is opened. Available options include Imagery,
U.S. Data, Worldwide Data, and Favorites.
when a section is opened. Available options include Imagery,
U.S. Data, Worldwide Data, and Favorites.
To see additional options for a specific server, right-click in the Select Data Source section on the existing data source name, such as NAIP Color Imagery for US layer.
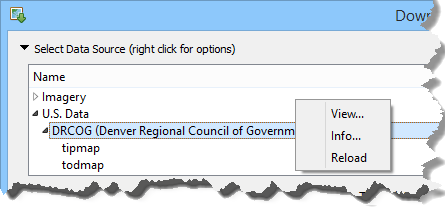
Right-click on the layer name to see the URL for the
layer or additional information about the layer.
To view the data source for any predefined server, right-click on the predefined server name and select View. The View Data Source dialog allows predefined web server URLs to be edited. This may be useful if the location for the server changes.
To view information about the server, right-click on the server name and select Info. The Server Information dialog displays the results of attempting to connect to the server.
Layer information from the data source is cached on the local hard drive. This reduces the load time for the Select Data Source list. Update the layer information by right-clicking on the data source and selecting Reload in the context menu.
To view information about the specific layer, right-click on the layer name and select Info. The Layer Information dialog displays information such as the minimum scale, height or width, layer name and title. None of the options are editable.
To copy the server and layer name, right-click on the layer name and select Copy to Clipboard. You can then paste the text to any text editor, word processing program, or to the MapViewer window. The pasted information includes the name of the server, the server location, the layer title and layer name selected.
To add any layer to the Favorites section, right-click on the layer name and select Favorites. Any server from the Imagery, U.S. Data, or Worldwide Data section can be added to the Favorites. Only the selected layer is added to the favorites. Other layers from the same server are not added.
To remove any layer from the Favorites section, right-click on the layer name in the Favorites section and click Remove Favorite. Click Yes in the dialog to remove the layer from the Favorites. Click No in the dialog to keep the layer in the Favorites. Removing the layer from the Favorites section does not remove the server and layer from the Imagery, U.S. Data, or Worldwide Data section.
To add a new category to the Select Data Source section, right-click in the white space of the Select Data Source section. Select Add New Category to open the Create Category dialog. Type the name for the new category in the Category Name: field and click OK to create the category. Click Cancel to close the Create Category dialog without making any changes in the Select Data Source section.
To add additional data sources to the list, right-click on the white space in the Select Data Source section. Select Add Map Source to open the Add Data Source dialog. Set the Name, Type, and URL to the new web mapping service. Click Next and the web server can be tested. If the test is successful, click Finish and the new web mapping service is added to the Select Data Source list. If the test is not successful, click Back and edit the URL. After the new server is added to the Select Data Source list, the list is alphabetized.
All custom data sources are saved to an INI file, allowing multiple Golden Software programs to use the custom definitions. The INI file is located at C:\Users\<username>\AppData\Roaming\Golden Software\Shared\Geode.ini. The file can be copied from one computer to another to share custom data sources between multiple computers and users.
To edit the data source for any custom server, right-click on the custom server name and select Edit. The Edit Data Source dialog allows custom web server Name, Type, and URLs to be edited. This may be useful if the location for the server changes or if the name listed in the Download Online Maps dialog should be changed.
To view information about the server, right-click on the server name and select Info. The Server Information dialog displays the results of attempting to connect to the server.
To delete a custom server from the Select Data Source list, right-click on the server name and select Delete. In the Delete Data Source dialog, click Yes to delete the server. Click No to keep the server in the Select Data Source list.
The Select Area to Download section controls the areal extent of the image being downloaded. Available options are Entire data source extents, Within XX units of Longitude X Latitude Y, or Specify Latitude/Longitude extents. Click on the desired option to select it.
Select the extents of the image to download in the Select Area to Download section.
The Entire data source extents reads all of the data on the specified server. All of the data is downloaded in the single image. With servers that cover large areas, this option is not recommended because even at high resolutions, very little detail will appear on the downloaded map.
The Within XX units of Longitude X Latitude Y option allows a single longitude and latitude value to be entered. A square area is downloaded based on the XX value and the units option. The square is centered on the value entered for the Longitude and Latitude. To use this option, enter valid values in each box.
The first box sets the width and height of the square area. For instance, 25 can be input.
The second option (units) can be set to either Kilometers or Miles. Click on the existing option to select the desired option.
The third option is the central Longitude value. In the example below, the center point of the downloaded image will be -105.220139. Longitude values must be between -180 and +180. Negative values are western hemisphere longitudes. Positive values are eastern hemisphere longitudes.
The last option is the central Latitude value. In the example below, the center point of the downloaded image will be 39.753304. Latitude values must be between -90 and +90. Negative values are entered for the southern hemisphere. Positive values are entered for the northern hemisphere.

The downloaded area will be 25 miles wide and 25 miles tall. The image will be
centered on the longitude and latitude location of -105.220139, 39.753304.
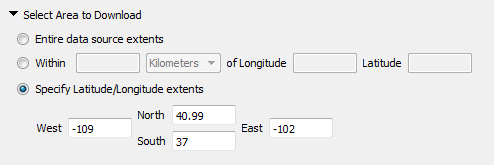
The Specify Latitude/Longitude extents option allows a rectangular area to be input in latitude and longitude coordinates. When adding a base map layer to an existing map with a defined coordinate system, this option is automatically selected. The boxes are filled in with the map limits of the current map. After selecting this option,
Type in the western-most edge for the downloaded map in longitude degrees coordinates in the West box. Longitude values must be between -180 and +180. Negative values are western hemisphere longitudes. Positive values are eastern hemisphere longitudes.
Type in the eastern-most edge for the downloaded map in longitude degrees coordinates in the East box. Longitude values must be between -180 and +180. Negative values are western hemisphere longitudes. Positive values are eastern hemisphere longitudes.
Type in the northern-most edge for the downloaded map in latitude degrees coordinates in the North box. Latitude values must be between -90 and +90. Negative values are entered for the southern hemisphere. Positive values are entered for the northern hemisphere.
Type in the southern-most edge for the downloaded map in latitude degrees coordinates in the South box. Latitude values must be between -90 and +90. Negative values are entered for the southern hemisphere. Positive values are entered for the northern hemisphere.
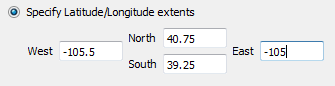
The downloaded area will cover from -105.5 to -105
degrees longitude and 39.25 to 40.75 degrees latitude.
The Select Image Resolution to Download section controls the quality of the image being downloaded. Drag the slider to the right to increase the image resolution. The farther to the right the slider is located, the better the resolution and the larger the image. Clicking on one of the lines on the left side of the slider will normally download a map of sufficient quality that is smaller in size. The larger the file size, the longer the image will take to process and the more memory the program will use to manipulate the image. If N/A is displayed or no size information is displayed, the image cannot be downloaded at the requested resolution. Change the resolution by moving the slider to select a different size image.

Set the image quality by dragging the slider to the right or left. Setting the
slider to the far left side downloads a small map with less resolution. Setting
the slider to the far right side downloads a very large map with
very fine resolution. This should only be used for small areas.
The Preview section displays a picture of the area to be downloaded. The image quality is controlled by the Select Image Resolution to Download. The Preview section contains a low resolution preview of the area.
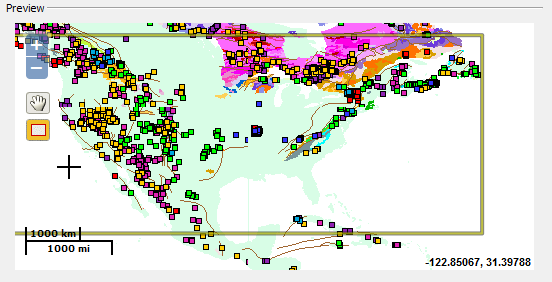
The Preview window displays the area to download,
buttons to zoom in/out, pan, or change the download area, a map scale,
and the coordinates of map cursor.
Click the  buttons
on the left side of the image preview to zoom in or out on the area.
Changing the zoom level does not affect the area to download. The
area to download is indicated in the Preview
section by a yellow outline.
buttons
on the left side of the image preview to zoom in or out on the area.
Changing the zoom level does not affect the area to download. The
area to download is indicated in the Preview
section by a yellow outline.
Click the  button
on the left side of the image preview to quickly move the image in
the Preview section. The
cursor changes to
button
on the left side of the image preview to quickly move the image in
the Preview section. The
cursor changes to  , indicating pan mode. Click
and hold the left mouse button down and drag the image to change the
view. Changing the view does not affect the area to download. The
area to download is indicated in the Preview
section by a yellow outline.
, indicating pan mode. Click
and hold the left mouse button down and drag the image to change the
view. Changing the view does not affect the area to download. The
area to download is indicated in the Preview
section by a yellow outline.
Click the  button
on the left side of the image preview to change the extents of the
image that is downloaded. The cursor changes to
button
on the left side of the image preview to change the extents of the
image that is downloaded. The cursor changes to  ,
indicating draw mode. Click and hold the left mouse button down and
drag the mouse over the area to download. The zoom extents update
and the yellow box coincides with the area drawn. The Select
Area to Download also updates. Only the portion of the
image highlighted by the yellow box will download.
,
indicating draw mode. Click and hold the left mouse button down and
drag the mouse over the area to download. The zoom extents update
and the yellow box coincides with the area drawn. The Select
Area to Download also updates. Only the portion of the
image highlighted by the yellow box will download.
Note: The selected server may have an original data source resolution (for example, 1 meter/pixel) for its imagery. You may be able to select an image resolution higher or lower than this original data source resolution. Increasing the image resolution here cannot give you better image detail over the original data source. By requesting a higher resolution than the original data source, the image is simply larger in size and in the number of pixels. The server returns the requested image in the requested size. There is no way to know what the original data resolution is for each individual server.
The Log section displays the tiles that have previously been downloaded in the current session.
Once all of the options are set, click OK to download the image. Click Cancel to cancel the download and return to the Surfer plot window. Click Help to open the help file.
If the OK button is not available, the layer is not selected. Go back to the Select Data Source section and select a specific layer, not a server name.
Note: Download speeds will vary, depending on the server selected. Some servers may become unresponsive. These data sources are on external servers which are out of Golden Software's control. If one server is unresponsive or slow to download, you may wish to select a different server.
Base maps from servers are named with the map server name, such as Base-Orthoimagery/USGS_EDC_Ortho_NAIP. In addition, the image downloaded with the base map from server adds attribute information, including the server name and layer title.
See Also