Edit contour line hachures in the Hachures dialog, accessed by clicking Hach in the header row of the Levels dialog Objects in levels list.
Add hachures and edit hachure properties in the
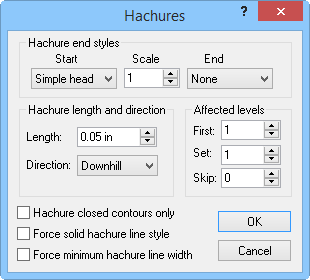
Hachures dialog.
Select start and end hachure styles and change their scale in the Hachure end styles section.
To add or change hachures, select None, Simple head, Filled head, Triangle head, or 2-stick head in the Start or End lists.
To change the hachure size, type a number into the Scale
box. You can also change the value by clicking the  buttons.
Change the hachure length by typing a number into the Length:
box or clicking the
buttons.
Select Uphill or Downhill in the Direction: list to select the hachure direction.
Pick the first contour line to have hachures in the First:
box. Type a level number or click the to select the
first affected level.
Choose the level set in the Set:
box. Type a number or click the
to select the affected level set.
Skip lines with hachures by changing the value in the Skip:
box. Type a number or click the
to select the number of contour lines to skip between hachures. For example,
setting Skip: to "0"
draws hachures on every contour line, setting Skip:
to "2" places hachures on every third contour line.
Click the Hachure closed contours only check box to only draw hachures on closed contour lines.
Click the Force solid hachure line style check box to force the solid line style on hachure lines.
Click the Force minimum hachure line width to make the hachure lines as narrow as possible.
Click OK to apply your changes to the hachures. Click Cancel to discard changes and close the Hachures dialog.
See Also