 button to open the Texture Mapping
dialog.
button to open the Texture Mapping
dialog.The Texture Mapping dialog allows you to display a fill pattern or an image on prism maps. This can add additional information to your map, such as a company logo or an advertisement. You might also want to display a texture fill pattern or an image across prism map faces simply to enhance the map appearance.
To add texture to a prism map:
1. Create a prism map.
2. Click on the Map page in the Property Manager.
3. Set the Color method to Boundaries.
4. Click
the Texture
button to open the Texture Mapping
dialog.
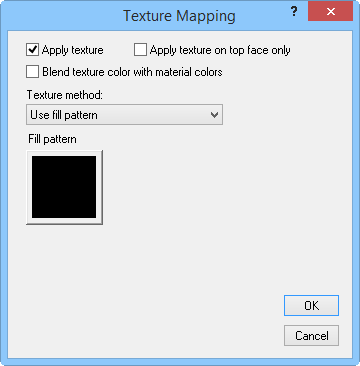
Display a fill pattern or bitmap on a prism map in the Texture
Mapping dialog.
Applying Texture
Check the Apply texture box to add texture to a prism map. This option must be checked to access the other settings in the dialog. If the Apply texture on top face only box is checked, the image or fill pattern is only drawn on the top of the prism map areas. If this option is disabled the texture is drawn on the sides and tops of the prism map objects. The Blend texture color with material color option blends the defined texture with the fill properties of the prism map objects.
Texture Method
There are two texture methods to choose from in the Texture method list:
Use fill pattern allows you to specify a fill pattern to use for the prism map texture. A Fill pattern button appears when this option is selected. Click the Fill pattern button to access the Fill Properties dialog.
The
Use image texture method
creates a prism map texture based on an image. When this option is
selected, an Image file option
appears. Click the  button to select an image file.
After an image is selected, a preview of the image is shown in the
dialog. A number of image
file formats can be opened. Once you have selected a image, a
small preview of the image is displayed in the dialog window.
button to select an image file.
After an image is selected, a preview of the image is shown in the
dialog. A number of image
file formats can be opened. Once you have selected a image, a
small preview of the image is displayed in the dialog window.
See Also